Cricut Envelope Addressing | Beginner How To Guide
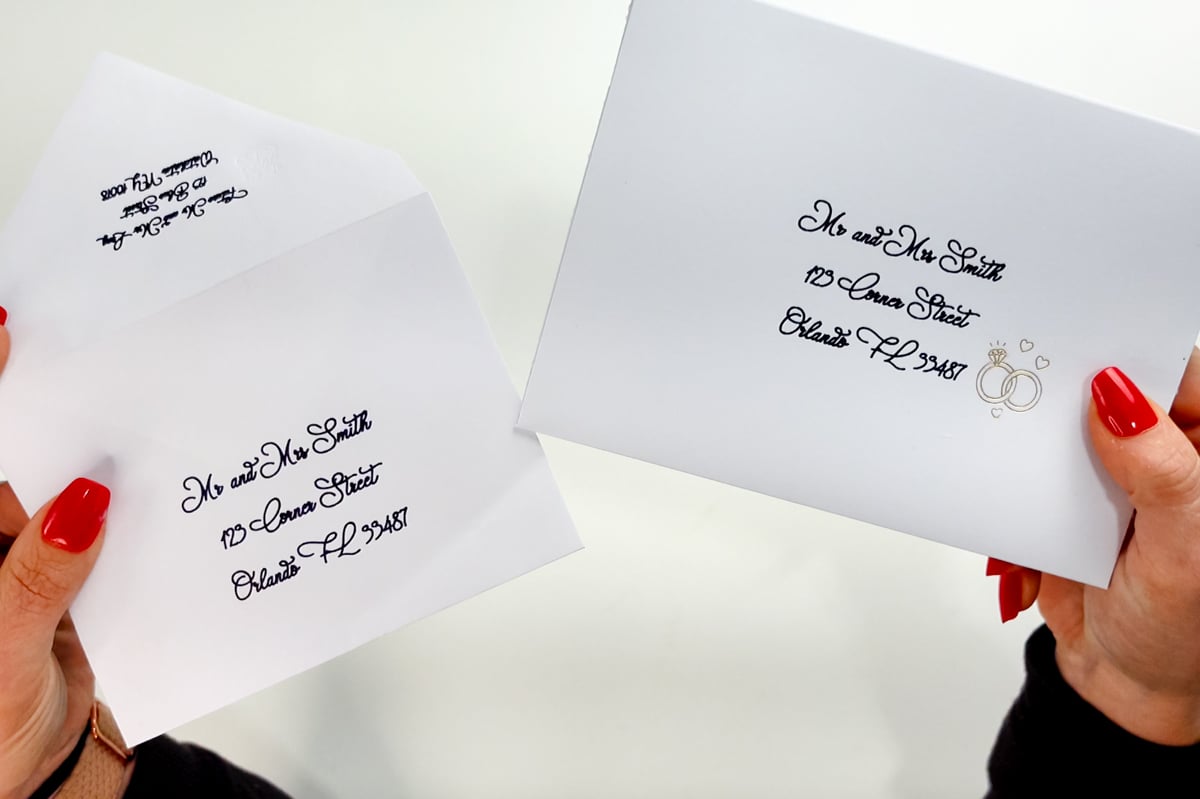
When it comes to crafting wedding invitations, holiday cards, or cute envelopes for any special occasion, the finishing touch is always the envelope. With Cricut envelope addressing, you can create beautifully styled envelopes that look professional without any calligraphy skills.
Whether you’re using a ready-made envelope or cutting your own envelope from scratch (or with my free SVG), this beginner-friendly tutorial walks you through every step using your Cricut machine and Cricut Design Space. We’ll cover pens, foil, and debossing options, and share troubleshooting tips to help you avoid common mistakes. Let’s make your envelopes shine!

Tools and Materials
To get started with Cricut envelope addressing, here’s everything you’ll need:
*This blog post contains affiloiate links that help me earn
- Cricut Machine (Maker, Explore, or Joy) – for the Joy series, keep in mind you will be limited greatly on size. Also, for debossing you must have a Maker. The foiling tool can be used on any machine.
- Smooth white or colored cardstock – I would suggest a 65 lb or higher and if possible 12×12 in size.
- Cricut Pens (or third-party pens with adapter) – I used the Black .4mm Cricut pen. You can also use Crayola Markers and an adapter. Really, you can use anything you want for this!
- Foiling Tool + Foil Transfer Sheets – I did not do the full address in foil because to be honest, and only in my opinion, the Cricut foiling tool can be a major pain to use. Using the foiling tool for addressing will be timely and could mess up many, many times causing you to lose your sanity. But, it is doable if that is the vibe you are going for!
- Scoring Wheel or Scoring Stylus – if cutting out your own envelopes.
- Debossing Tool (for Maker machines) – if you want to add on a small decal
- Brayer Tool (optional, for better mat adhesion) – I love my brayer it’s one of my favorite and most used tools.
- Cricut Mat (LightGrip or StandardGrip depending on your material) – I use standard grip for everything.
- Glue or double-sided tape (for assembly if making your own envelopes) – I suggest craft glue for the sides to make sure its very secure.
Two Ways to Address Envelopes with Cricut
You can use Cricut envelope addressing on both ready-made envelopes and envelopes you cut yourself. Let’s walk through both methods step by step.
Using a Ready Made Envelope

This is the easiest way and the fastest if you’re working on a larger batch of wedding invitations, holiday cards, or greeting cards. Here’s how to prep your file in Cricut Design Space:
Create a Guide for the Envelope Shape
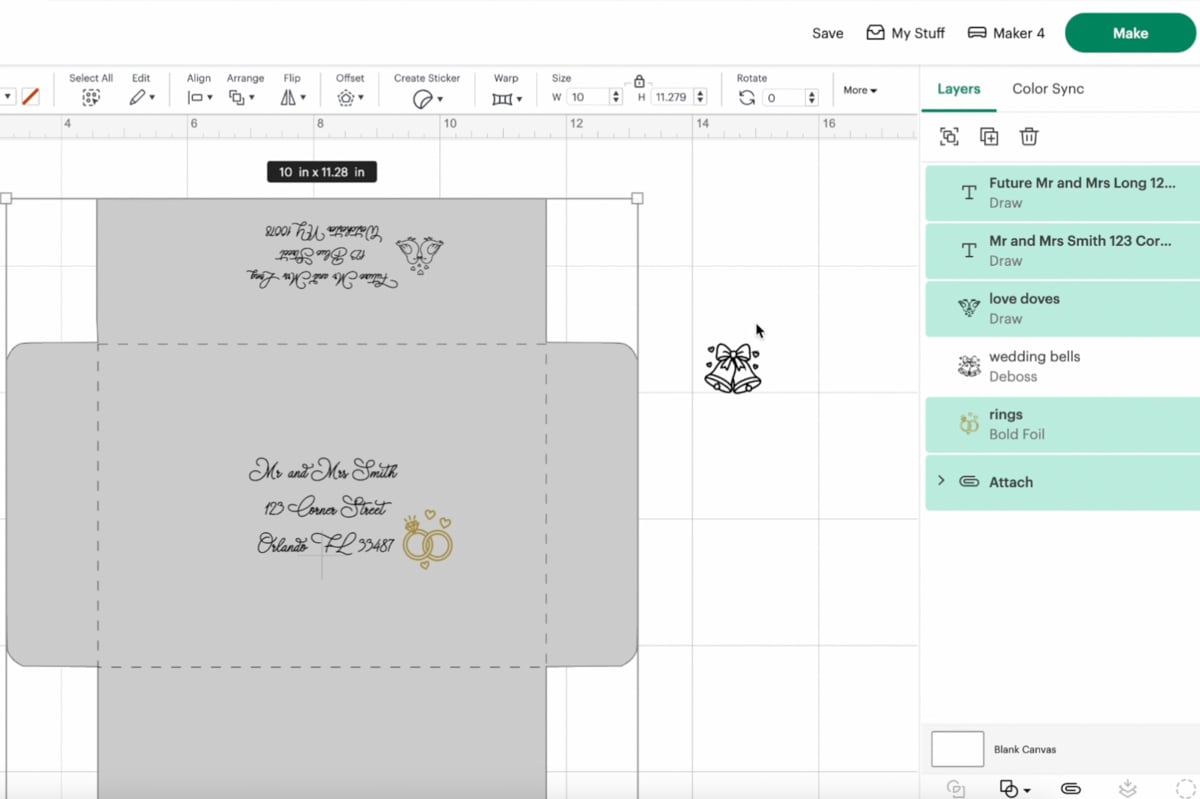
Use a shape in Design Space (usually a rectangle) to match the size of your envelope. Unlock the proportions and enter the correct dimensions. You can even add the flap by creating a triangle or trapezoid shape.

Add the Recipient’s Address
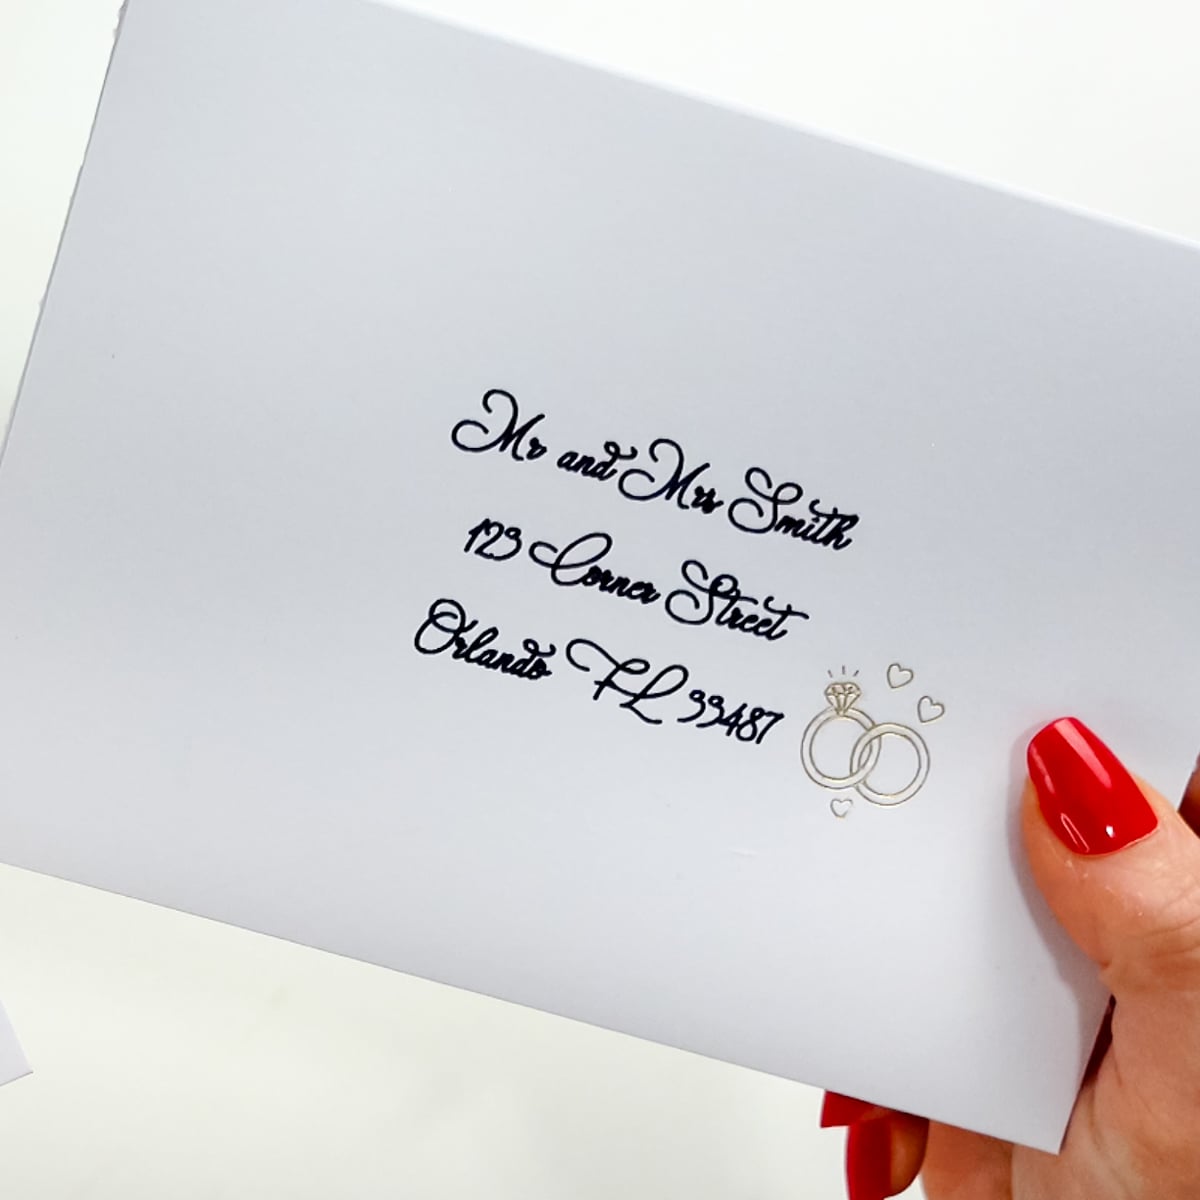
Use a text box and write out the address using a writing font. For best results, stick with free writing fonts, single-line fonts, or Cricut writing fonts. This ensures legibility, especially important for the postal system.
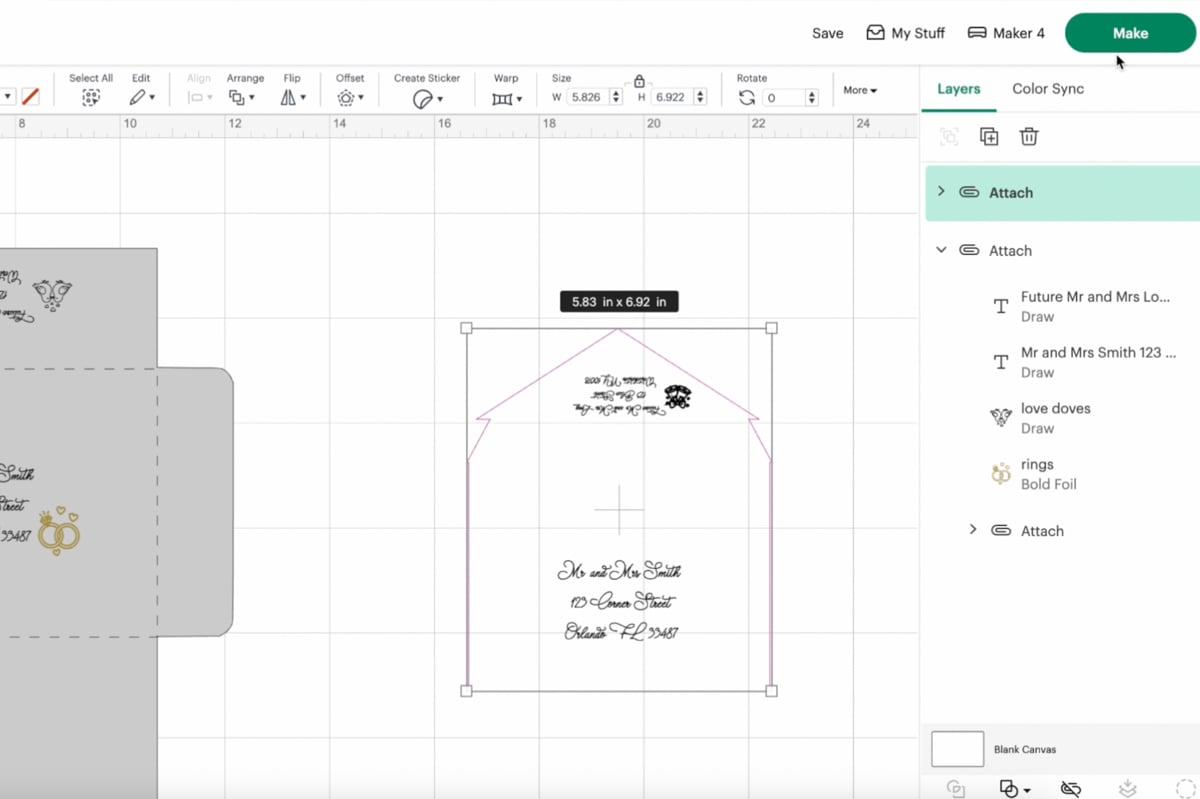
Set to Draw and Attach
Change the font style from cut to “Draw” and select your pen tool. You can also add cute touches with foil, gel pens, or debossing tool if you’re using Maker machines.
Use the Mat Preview
Use the mat preview screen to place your design exactly where the envelope will go on the cutting mat. This step is crucial for lining up your design with the front of your envelope or the flap for the return address.

Send to Your Cricut Machine
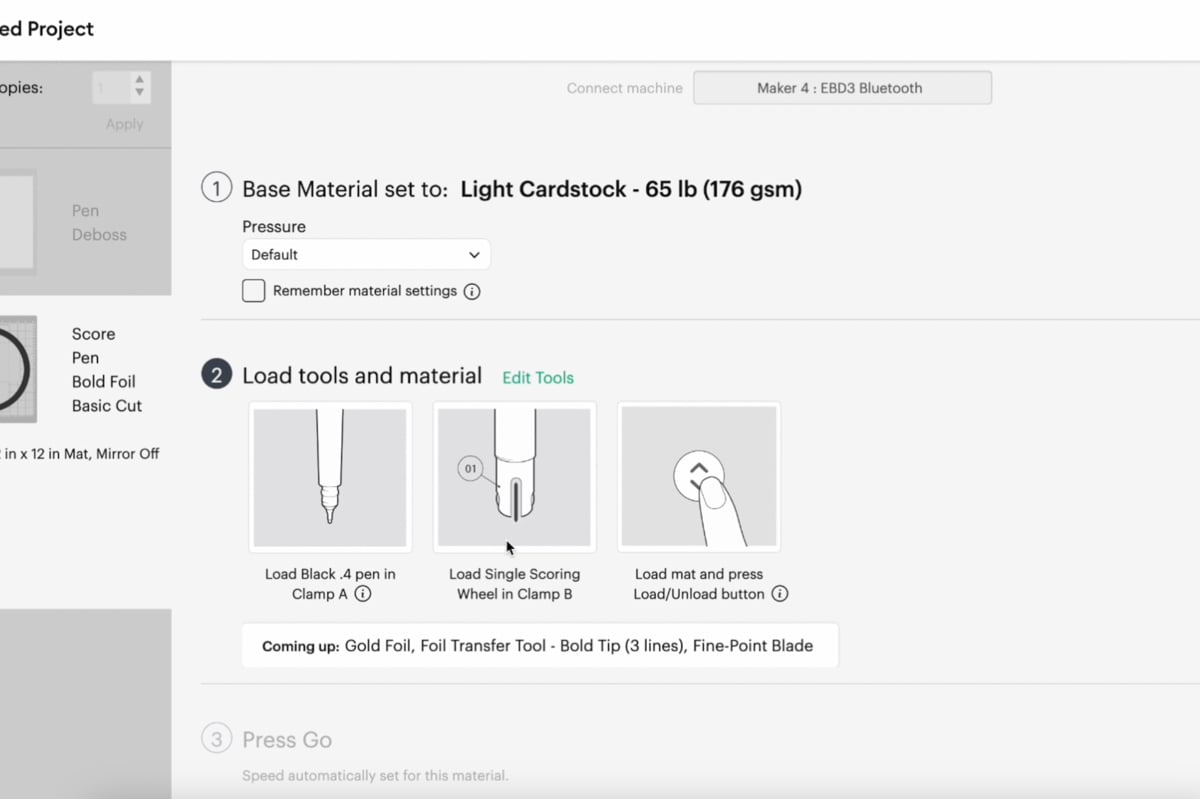
Load your Cricut mat, insert the appropriate tools (fine point pens, foil tip, etc.), and press the Go button. Be sure to follow on-screen prompts to switch between pen, deboss, and fine point blade if you’re doing all-in-one.
Pro Tip: If using foil, you can lower the pressure and use light cardstock settings to avoid tearing.
Making Your Own Envelope
Want complete control over your envelope shape and design? Use my free Cricut envelope template to cut and personalize your own envelope from cardstock.
Upload My Free Envelope SVG
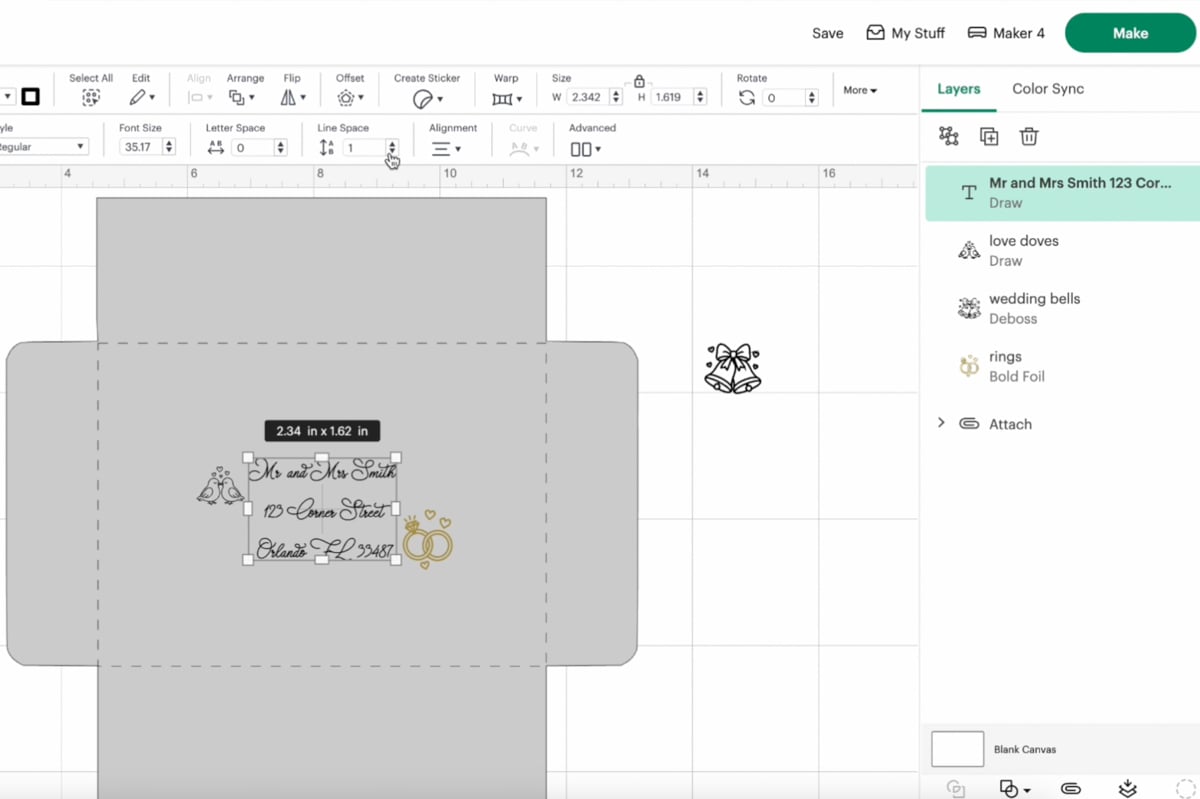
You’ll find the freebie download in my blog’s Community Vault below. Once uploaded, ungroup and convert the middle rectangle cut lines on flaps to score lines. Use either the scoring wheel or scoring stylus. Make sure to attach these together before sending to cut.

Add Addressing Details
As with the ready-made method, create your text boxes, align them on the front of your envelope, and change from basic cut to draw using your Cricut pens. Make sure if adding an address to the flap, it should be rotated 180 degrees so that it’s upside down to you in Cricut Design Space.
Decorate with Pen, Foil, or Deboss
Add cute designs, like wedding bells or doves. Use different pen colors, foil for a shimmer effect, or debossing for a subtle tactile finish. This is totally optional.
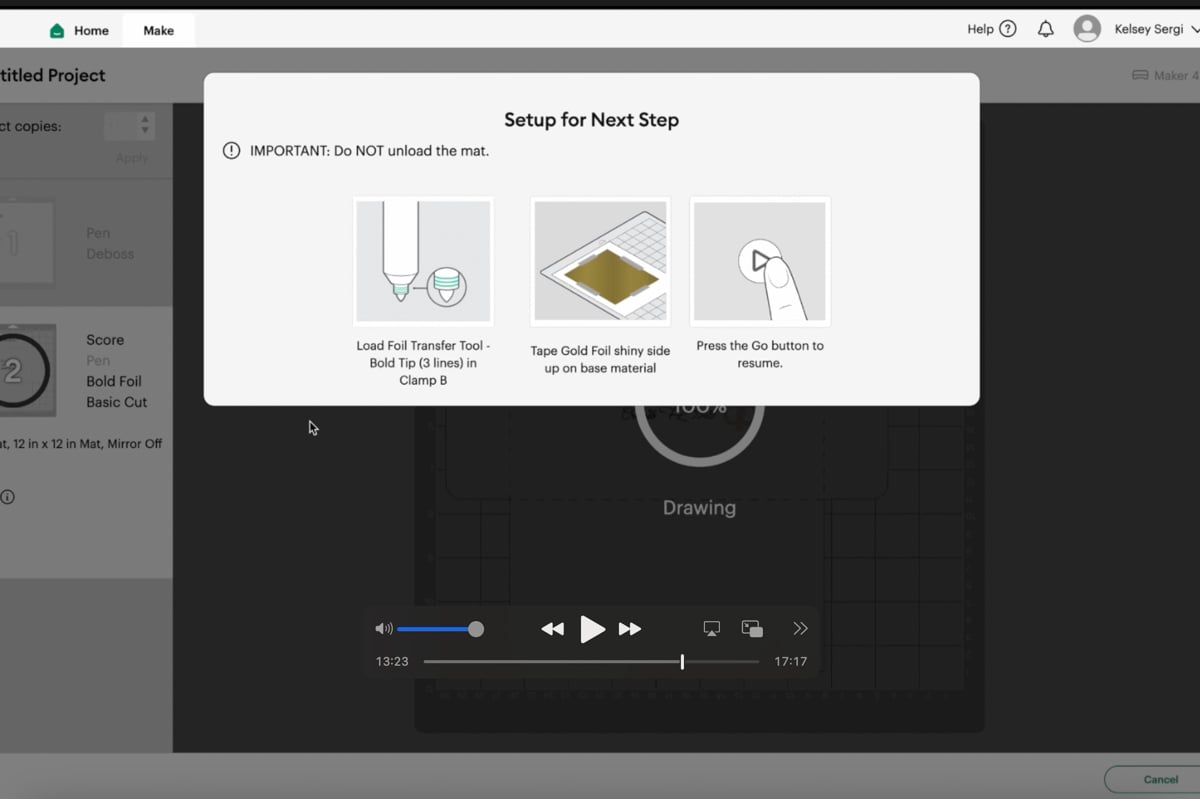
Load and Press Go
Insert tools as prompted and make sure you do not unload the mat between steps. Use the same mat throughout so all placement stays aligned. Design Space will walk you through when to change out blades.
Assemble the Envelope
Fold on all score lines, and glue side flaps to the bottom flap. Use double-sided tape for the final closure when ready to mail.

This method gives a personal touch and works great for handmade cards, small batches, or when you want full creative control.
Which Cricut Machines Work for Envelope Addressing?
- Cricut Maker – Ideal for all tools: pens, foil, scoring wheel, and deboss
- Cricut Explore – Compatible with pens, scoring stylus, and foil
- Cricut Joy – Works well for envelope labels and small card size projects using white pens. No scoring here.
Regardless of machine, using the right font, good-quality copy paper or cardstock, and the correct pressure makes all the difference.
Font Tips for Envelope Addressing
When choosing fonts, think legibility first—especially for the recipient’s address.
Best Practices:
- Use serif fonts or single-line fonts for better readability
- Avoid heavily stylized cursive fonts that lack punctuation
- Test different fonts and options on scrap paper before finalizing
- Keep your text layers grouped and aligned using the layers panel
Here are some of my favorite FREE writing fonts for you to try out.
Cricut Envelope Addressing for Special Occasions
Whether you’re sending out Christmas cards, wedding invitations, or thoughtful gift cards, Cricut envelope addressing adds elegance without the stress of terrible handwriting.
Here are a few ideas:
- Holiday cards with silver foil snowflakes
- Greeting cards in pastel envelopes with floral pen art
- Minimalist return address on the back flap with white pens
- Cute envelopes for kids’ parties using colorful gel pens
And yes, if you’re crafting in bulk, try addressing each envelope digitally, duplicate in Design Space, and simply edit each text box with the next name.
Common Questions & Quick Fixes
Why did my foil tear through the paper?
Try using lighter pressure and switch to light cardstock settings.
How do I center the address correctly?
Create a guide shape the size of your envelope, center your text with “Align Center,” and delete the shape before cutting.
Can I address envelopes with Joy?
Yes! Use envelope labels or direct writing for small cards.
My ink smudged! What now?
Keep envelopes away from water and allow ink to dry completely before stacking. And don’t be like me and accidentally place it into water and have it run!!

How to Download The Free SVGs
This week my freebies are the 3 wedding designs to add to the envelopes along with the free envelope itself. This envelope is for a 5×7 inch card but can be sized down or up slightly depending on what size paper you have. You can find these all in one zip file under Design Number #194 in my Community Vault. To gain access simply sign up for my free newsletter below to be sent the Welcome email and password – this usually takes about 5-10 minutes. You will find search instructions and download instructions inside the vault.
Get into the Community Vault here.
Want more wedding SVGs? Check out this page!
Whether you go with a sleek ready made envelope or take the DIY route and cut your own envelope, Cricut envelope addressing is a beautiful, modern way to elevate your mail.
From scoring wheels to pen tools, your Cricut machine gives you creative control. And once you find your favorite fonts, test your writing style, and get familiar with your cutting mat, you’ll never go back to writing addresses by hand.


Since the guide isn’t visible on the May preview, how can I use it to properly align the text on the envelope? It seems like there’s a major flaw in this technique. What am I missing?
A great way to keep a guide, make it a basic cut rather than a guide. make the color one you arent cutting. move this into the position you will place the envelope. Move the writing to this mat and place on. Nothing will be attached. Then use the three dots on the mat and hide the “template cut” this will be helpful but again, could not be perfect. You still have to be aware of where you are placing and aligning.