How to Make Acrylic Signs with Cricut using Acrylic Markers
If you’ve ever wanted to make a custom acrylic sign for a wedding, baby announcement, or special event without using vinyl, this project is for you. In this tutorial, I’ll walk you through how to make acrylic signs with Cricut using acrylic markers instead of adhesive vinyl. The result is a beautiful, with a handmade look that still lets your Cricut do most of the work… but no body has to know.
This method works great for wedding bar menus, table numbers, and baby announcement signs, and it’s beginner-friendly while still offering room to customize.

Why Use Acrylic Markers Instead of Vinyl?
Most acrylic sign tutorials rely on vinyl, which looks clean and professional, but sometimes too perfect. Using acrylic markers gives your acrylic sign a softer, more handmade appearance while still keeping everything precise.
PLUS no eyeballing, aligning, or messing up with bubbles in your vinyl!!
Your Cricut handles the writing, and you simply fill it in by hand.
Cricut & Acrylic Basics (Before You Start)
*this blog contains affiliate links, read my full disclosure here.

This acrylic sign project works on all Cricut machines as long as you’re using pen adapters (these are similar to the ones I use), depending on the size of the acrylic markers that you bought. I used my Maker 4 for this project but you can use any machine technically.
Acrylic Sheet Thickness
- My acrylic sheet was 0.4mm thick
- Maximum thickness that works well is just over 2mm
You’ll want to place your acrylic sheet on a StrongGrip mat, and because acrylic is rigid, setup matters. The strong grip was perfect for my acrylic and didn’t budge.
Find all of my favorite tools and materials here.
Important Cricut Tip: Move the Star Wheels
Before loading your mat, slide the white star wheels all the way to the right or left (away from the acrylic piece) on your Cricut. This prevents them from scratching your acrylic sign during the writing process. This step is easy to forget, but it makes a big difference.
Setting Up Your Acrylic Sign in Design Space
Open Cricut Design Space and start by creating a template that matches your acrylic sign sheet size.

- Insert a shape and unlock the proportions
- Resize it to match your acrylic sheet (mine was 8×10 inches)
- Change the shape from Basic Cut to Guide
Using a guide allows you to design without the Cricut attempting to cut or write on that shape.
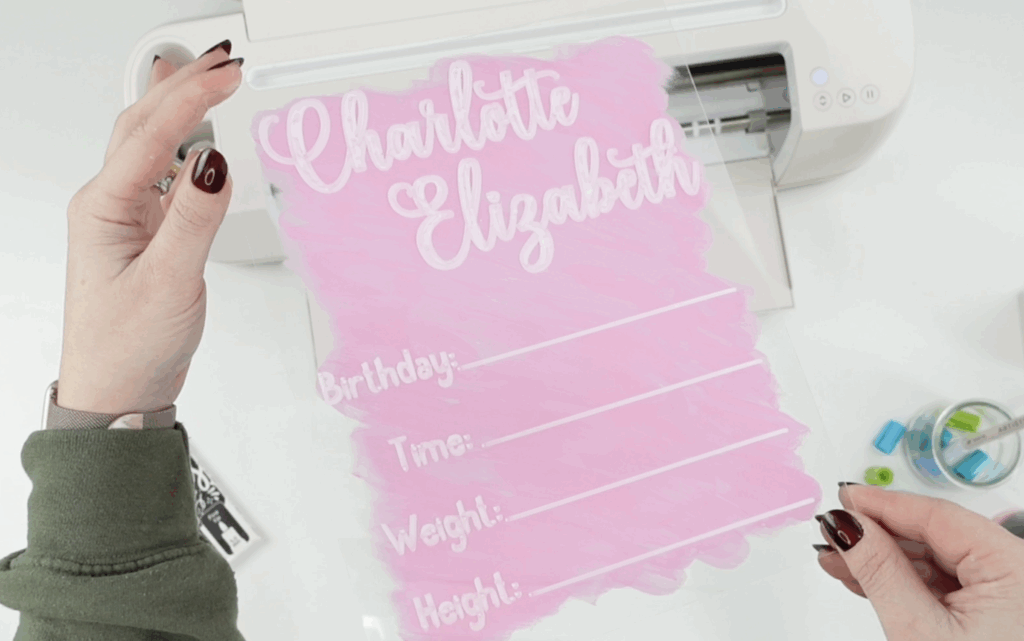
Now you can add your text. This is where you customize your acrylic sign for weddings or baby announcements. For weddings, think bar menus or table numbers. For babies, names and birth details work beautifully.
Adjusting Text for Acrylic Markers
Kerning (the spacing between letters) matters more here than usual. Because acrylic markers are thicker than Cricut pens, tight lettering can cause ink to overlap.
- Select your text
- Go to Edit > Letter Space
- Increase spacing slightly (around 0.3–0.5 works well but totally depends on your font)
If you’re creating multiple lines (like name, date, weight, time), use Align and Distribute Vertically to keep everything evenly spaced.

Once your layout looks good:
- Select all writing elements
- Attach them
- Change the operation to Pen
You will want to adjust on the mat in Cricut Design space so that your writing for the acrylic sign is centered. I chose to move mine to the bottom of the mat and centerd it.

Writing on the Acrylic Sheet
Place your acrylic sheet on the StrongGrip mat and secure it with masking tape if needed. I only used a small amount because my mat was new, but older mats usually need extra support.
Quick note: acrylic markers do not fit directly into Cricut’s pen clamp. You’ll need adapters. Using non-Cricut pens can void your warranty, so keep that in mind.
Once your pen is loaded, select the appropriate acrylic or acetate setting and let your Cricut write.
Filling in the Acrylic Sign by Hand
After the Cricut finishes writing on your acrylic sign:
- Unload the mat carefully
- Use the fine tip side of your acrylic marker to fill in any gaps
The Cricut outlines most of the lettering, so this step is quick and forgiving. This is where the handmade look really comes together.
To remove the acrylic safely, flip the mat upside down and peel the mat away from the acrylic — not the other way around.
Painting the Back for Extra Pop
To make the lettering stand out, flip your acrylic sign over and paint the back with acrylic paint.
- Apply two coats
- Let each coat dry in between
This is especially helpful for baby announcements placed in cribs or photo setups, and it still looks great for wedding signage displayed on stands.
Final Thoughts
This is one of my favorite ways to make a custom acrylic sign because it blends Cricut precision with a personal touch. Whether you’re creating wedding bar menus, elegant table numbers, or a baby announcement keepsake, acrylic markers open up so many creative options.
If you enjoyed learning How to Make Acrylic Signs with Cricut, be sure to join my free newsletter for the latest tutorials, Cricut tips, and access to my growing library of free SVG files. And as always, stay crafty!


I love this! It looks like it’s handwritten but much prettier than I could do on my own.
This looks so nice! I’m wondering if the acrylic marker will scratch off or chip easily?
It can be removed so it’s not permanent.
Can’t wait to make this for my daughter. Did you use acrylic markers or paint for the back of the acrylic sheet?
I used acrylic paint!
love this idea.
It turned out so good! To make it more permanent could you mirror the text, then when you paint to it should seal it.
great idea!!