Cricut Design Space Tutorial Part 2 | Canvas Tools Explained
If you’re following along with my Cricut Design Space Tutorial series, welcome back to my craft room! In Part 1, we covered the home screen and the left panel inside Cricut Design Space.
Today, we’re diving into Part 2: Canvas Tools Explained.
This post walks through every essential tool on the top menu bar and right-side layers panel inside the Cricut Design Space software. Whether you’re a Cricut beginner or just exploring the new features, this tutorial shows you how to manage text, layers, alignment, colors, offsets, welds, and more; all using the desktop version on a Mac.
If you’re opening Design Space for the first time, keep this tab up as a written guide while you work on your current project. Let’s jump right in.
Note: this blog post may contain affliate links, read my full privacy policy here.
Understanding the Canvas and Top Menu Bar
When you first open Cricut Design Space, to start crafting you’ll want to open on a blank canvas: the creative workspace where you build each project.
Machine Selection and Updates
Cricut recently updated the top bar to display your specific machine instead of just a generic “Maker” or “Explore.” This update helps you confirm you’re designing for the correct machine before cutting. If you own multiple machines; for example a Cricut Maker, Cricut Joy, or Cricut Explore machine; you can easily switch between them using the drop-down menu at the top.
Just note: once you move forward to the “Make It” screen, you can’t switch machines without returning to your home page. So if you pick the wrong machine during a new project, click back to your mat set up or canvas before cutting.
This update was part of Cricut’s new features rollout alongside the Create AI tool; which you can read about in my full Cricut Create AI tutorial.

Operation Menu: Choosing How Your Machine Cuts or Draws
At the top of your canvas, you’ll see the Operation Menu. This section controls what your new Cricut machine will actually do with your design: cut, draw, score, deboss, engrave, or foil.
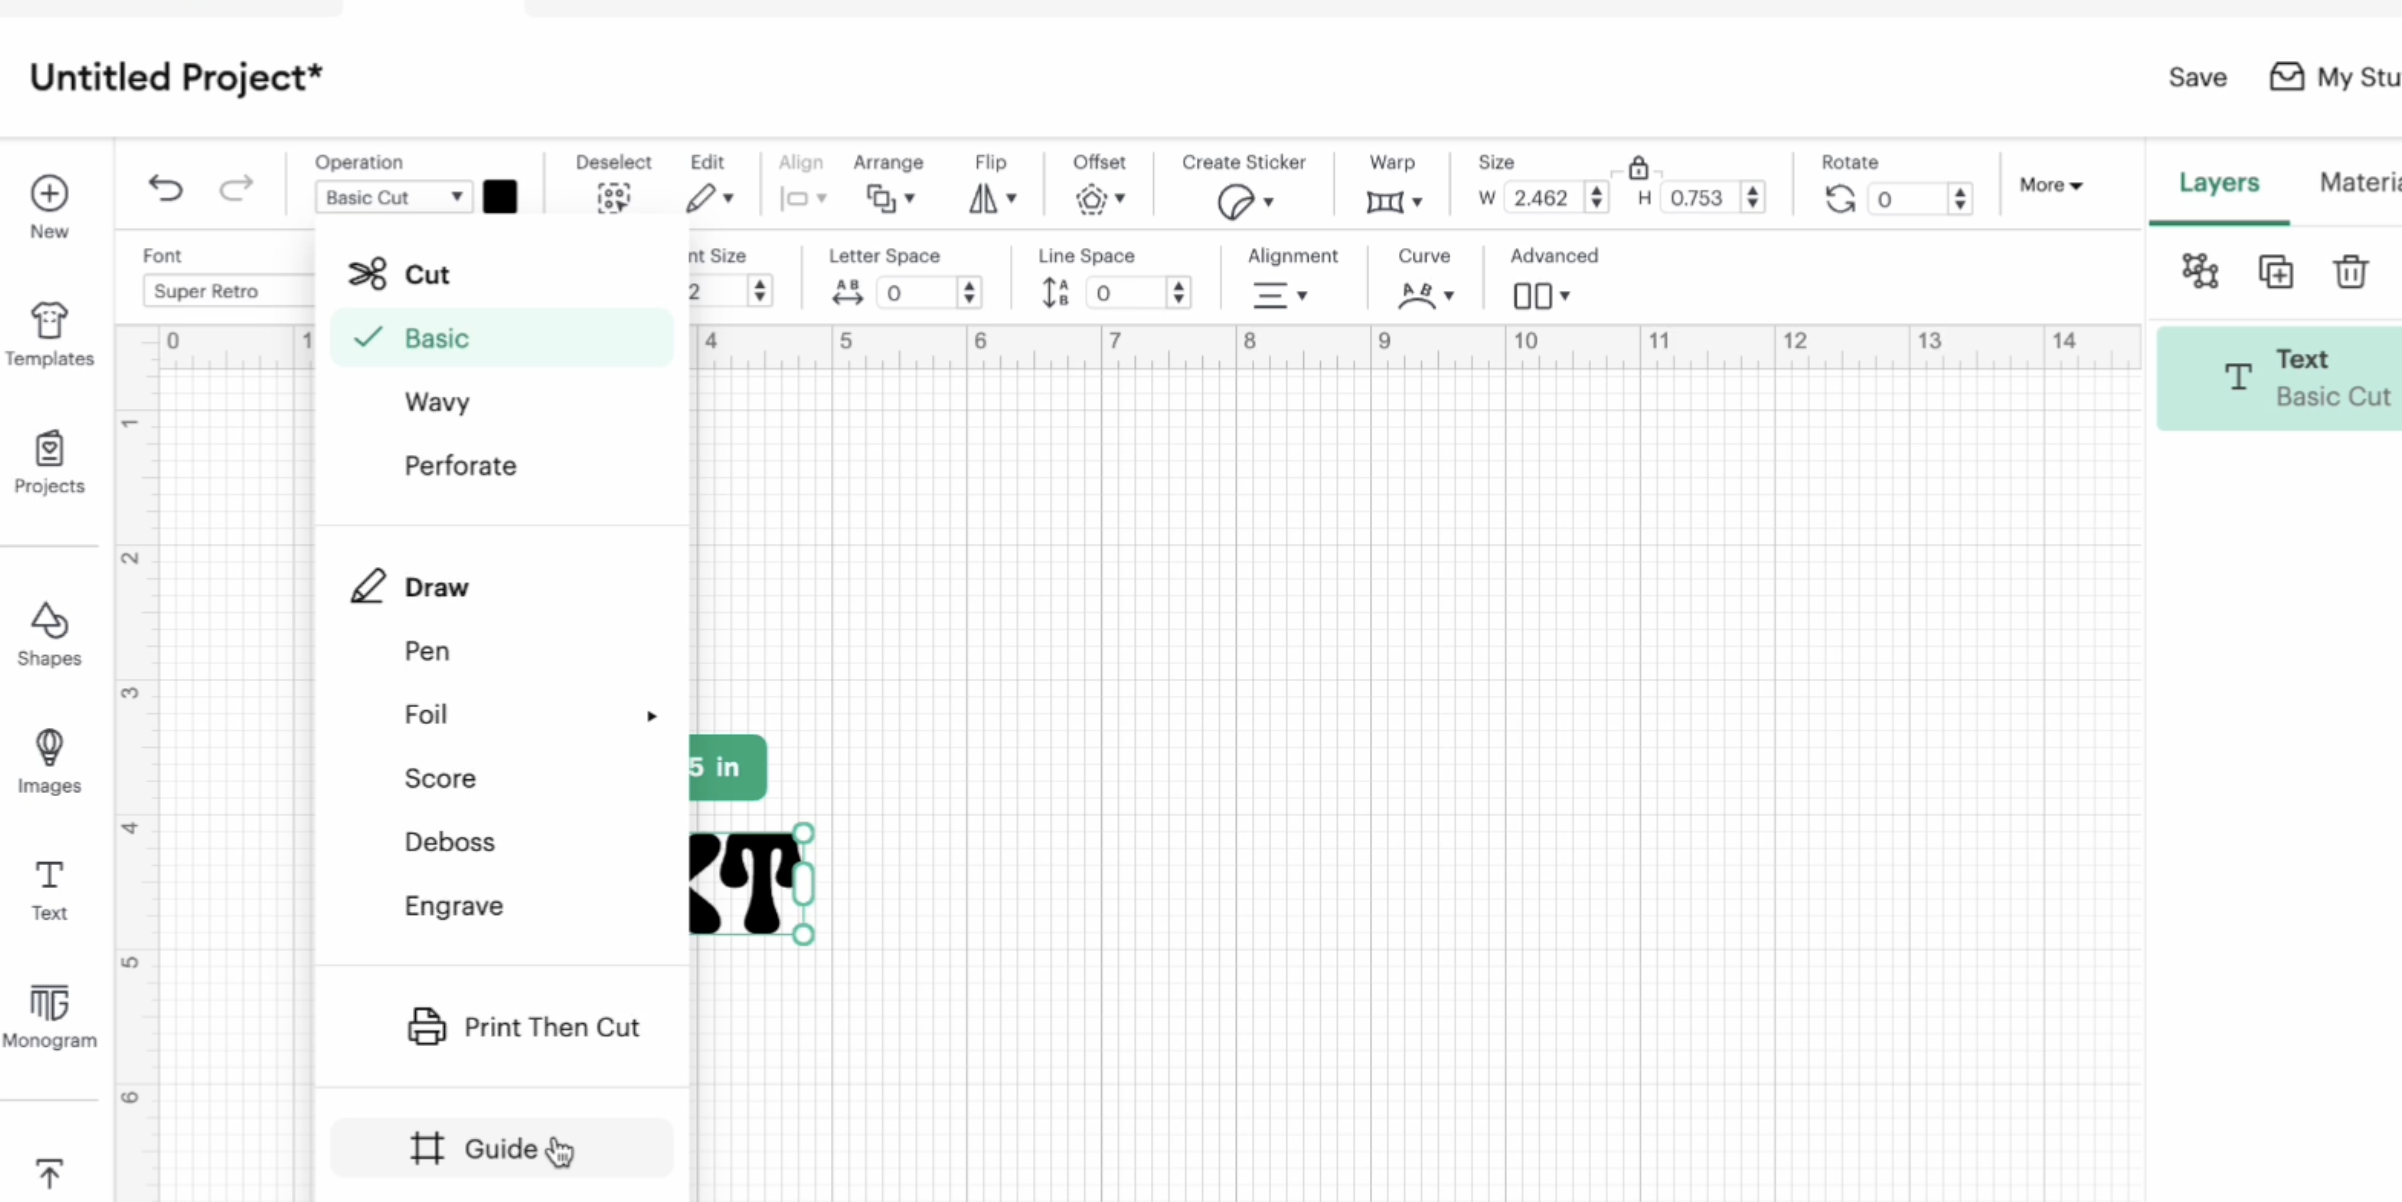
If you’re using a Cricut Maker, you’ll see the full list of options:
- Basic Cut (for vinyl, cardstock, or most materials)
- Wavy (blade for decorative edges)
- Perforation (blade for tear-away projects or crisp folds)
- Pen / Draw (for writing and sketch pens)
- Foil Tool (for shiny foil accents)
- Score Line (for cards and folded projects)
- Deboss (tool for etched details)
- Engrave (using the knife blade on metals and plastics)
Each Cricut machine offers different options depending on compatibility. For example, the Cricut Joy or Explore series do not support engraving or debossing. Always check the drop-down menu for available tools on your current project and make sure you have the right machine selected.
When selecting your operation, also review material selection. The Cricut Design Space software adjusts cut pressure and passes based on your chosen material. Whether you’re cutting vinyl, paper, or engraving metal, selecting the right setting saves time and waste.
Color and Material Settings
To the left of the Operation menu you’ll find the material color picker. This lets you preview each layer of your project using color swatches.
Click Advanced to enter a HEX code if you want an exact shade.

While colors won’t affect cutting materials like vinyl or cardstock, they help you organize materials and see your selected layers clearly. For print then cut projects, color accuracy is especially important since you’ll be printing first and cutting after.
Working with Text Tools in Cricut Design Space
Adding text is one of the most common things you’ll do in Design Space. Click “Text” on the left panel and a box will appear on your canvas.
Inside the text toolbar you’ll find sections for Cricut Fonts, System Fonts, and Bookmarked Fonts.
If you don’t have a Cricut Access membership, you can still use any of your own fonts installed on your computer. On Mac, just install a font file and restart Design Space to see it in the list.
Letter Spacing and Line Spacing
Under the text toolbar, you can adjust letter spacing (space between each character) and line spacing (space between multiple lines of text). This is helpful for making fancy writing fonts easier to weld or layer cleanly.
If you’re creating a single layer cut design, reducing letter spacing helps letters connect so they cut as one continuous shape. That’s a great way to avoid extra weeding later.
You can also curve text using the “Curve” option or use the “Advanced” menu to Ungroup to Letters for full control. Ungrouping lets you rearrange individual letters for that perfect font layout.
The Alignment Menu and Arranging Design Elements
When you have multiple shapes or text boxes selected, you’ll see alignment options appear along the top. These help you organize your design elements precisely.

Here’s what each alignment does:
- Align Left, Center, Right – for horizontal placement.
- Align Top, Middle, Bottom – for vertical alignment.
- Distribute Vertically/Horizontally – for even spacing between three or more items.
The arrange menu lets you bring an object to the front or send it to the back. This matters when layering images or text for stickers or SVG designs that have multiple image layers. This doesn’t effect the cut unless you use attach (which is covered more below). This menu is only for designing purposes.
Flip and Rotate Tools
You can easily flip any object horizontally or vertically. If you’re working with symmetrical basic shapes, you’ll notice how the Flip tool keeps your design balanced even on a smaller scale.
Use Rotate to spin your design freely; you can drag corners or enter an exact degree in the position menu.
Offset: Creating Borders and Shadows
Offset is one of my favorite features inside Cricut Design Space. It adds a border around any object or text for stickers, layered cards, and multi-color Cricut projects.
Drag the slider to set how thick you want the outline to be. You can also create an inset offset that goes inside your shape instead of outside. Toggle between rounded or sharp corners based on your design style.
This tool is a good idea to use before making stickers. Combine it with Flatten to create the classic white sticker border that cuts cleanly around the image.
Create a Sticker Feature
The Create a Sticker feature is available with a Cricut Access membership, though you can replicate it manually with the Offset and Flatten tools.
If you do use the built-in tool, you’ll see options for “Die Cut” and “Kiss Cut.” A Die Cut goes through the entire sticker sheet, while a Kiss Cut leaves the design on the backing paper (think sticker sheets)

You can also add a border color or cut the separate parts of a design for custom stickers.
If you prefer the manual method, check out my full DIY Sticker Tutorial where I walk through the best way to create stickers without paying extra money for membership features.
Warp Tool
The Warp feature is a new addition to the Cricut Design Space software. It lets you curve or bend text into fun shapes. Right now, it’s exclusive to Cricut Access members and only offers preset curves rather than manual handles.

If you want more freedom, I suggest warping text in Inkscape first, then upload the image as an SVG or PNG image into Design Space. That’s a great way to get custom styles without membership fees. See my full tutorial on this here.
Resizing and Position Controls
Every object on your canvas has an editable size box. Lock the aspect ratio if you want to scale proportionally, or unlock to resize freely.
You can also enter exact numbers in the Position and Size fields if you need the right size for a card, cup, or shirt design. If you’re using a cutting mat, remember that the largest cut area is limited to about 12×12 or 12×24 inches depending on your mat size and different materials used. But truly, it’s more like 11.5×11.5 and 11.5×23.5.
Layers Panel Overview
The Layers Panel on the right side is one of the most important sections of this Cricut Design Space Tutorial. It shows every image layer, group, and color you’ve used in your entire project.
You can click to select individual selected images or hold Shift to highlight multiple selected layers.
This is how you align, group, and arrange objects together without accidentally moving something out of place.
To group elements, select them and click “Group.” This keeps everything together while you resize or reposition. To ungroup, click the same button again.
At the bottom of the Layers panel you’ll find Slice, Combine, Attach, Flatten, and Contour; five essential tools that you’ll use constantly as a Cricut expert in training.
Slice Tool: Cutting Shapes Out of Each Other
Slice lets you cut one shape from another. Select two items that overlap and click Slice to separate them into new separate parts. You’ll see individual pieces you can move around independently.
Use Slice for custom designs like text cut through shapes or creating windows in cardstock. It’s a great way to turn free images into layered art.
Combine and Weld
Combine includes several options: Unite, Subtract, Intersect, and Exclude.

- Unite temporarily joins layers so you can still edit them later.
- Subtract removes the top layer from the bottom.
- Intersect keeps only the overlapping parts.
- Exclude does the opposite of Intersect and keeps everything else.
When you’re certain your design is finished, use Weld to permanently merge everything into a single layer. That’s how you prevent script fonts from cutting each letter individually. It’s the best way to finalize text for vinyl projects.
Attach and Flatten
Attach keeps objects in a specific arrangement so they cut exactly where you see them on the canvas. Without Attach, Design Space will automatically rearrange items to use less material. This is a major Cricut Design Space Tutorial must know!

Use Attach when layering different sizes of hearts or letters that must stay together on a cutting mat.
Flatten turns a multi-layer design into a printable single layer for print then cut projects. It merges all visible colors and lines into one flat image to print on your home printer before cutting.
This feature is perfect for stickers, labels, and different projects that need printed details.
Contour Tool
Contour hides or shows specific cut lines within a shape. It’s great for removing tiny details or holes you don’t want cut.

Select your object and click Contour at the bottom of the Layers panel. Then choose which areas to hide.
Keep in mind: the shape must be a closed path to work; so outlines and connected elements only.
Material Colors and Color Sync
The tab next to the Layers panel shows your material colors (previously called Color Sync). This helps you combine different layers of similar colors into one mat for faster cutting.
Drag one color layer onto another to merge them; a good idea if your project uses several shades of red vinyl and you want to simplify your material selection.
Tips for Beginners Working on Desktop (Mac)
Since I film all my Cricut YouTube channel tutorials using a Mac, here are a few small desktop-specific tips for your first project:
- Always save your current project before switching between machines.
- Use Command + Z to undo quickly while experimenting with design elements.
- You can use the search bar to find your projects faster under the home page tab.
For mobile device users things might look a little different. Let me know if you want a separate tutorial for iPad/iPhone.
Making the Most of Cricut Access (Optional)
While you don’t need a Cricut Access membership to complete this tutorial, it does unlock unlimited access to premium fonts, free images, and seamless pattern fills.
It’s completely optional; you can use your own designs and own fonts without paying a monthly fee. If you do subscribe, remember to cancel anytime so you’re only billed for months you use it actively. Worried about cancelling? No problem, I talk all about it here.
Next Steps and Practice Ideas
You’ve now covered almost every essential tool on the Cricut canvas; from basic shapes to layering, text alignment, offsets, and welding.
If you’re a first time Cricut user, try creating a simple layered vinyl decal using a free SVG file from my Community Vault. It’s the best way to practice everything in this Cricut Design Space Tutorial; without spending extra money on SVGs or Access. Simply sign up for my free weekly newsletter below and get the password to enter.
Once you’re comfortable with these steps, you’ll be ready to move on to more advanced Cricut projects, like stickers, labels, and paper crafts that combine different materials and layers.
More Cricut Tutorials
If you missed Part 1 of this Cricut Design Space Tutorial, start there first:
👉 Cricut Design Space Tutorial for Beginners | Part 1
Then, check out:
💌 And don’t forget: grab all my free SVG files by joining my Community Vault; it’s free to sign up and gives you instant access to hundreds of SVGs, PNGs, and templates for your next new project.
Design Space Tutorial Conclusion
Mastering Cricut Design Space takes a little time, but understanding how the canvas tools work will transform how you create. From text editing to different layers, offset shadows, and the slice tool; these features help you bring any Cricut project idea to life.


